
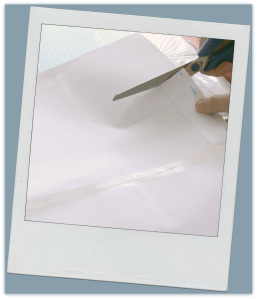
The template. It is important to draw the template, in order to cut the fabric in the right measures. First of all I take a large piece of thin paper, or pattern paper, (or more paper sheets joined together with adhesive tape) and a soft pencil. Then I lay the shade (already provided for its polystyrene panels) on it and, from the vertical rear seam, I begin to roll the shade and to trace around the rims on all sides to the starting point. With a ruler I extend the sides of each line out 2-3 cm. and trace a further edge in all directions the lines were heading. Finally, I cut the template out of the piece of paper with scissors or a craft cutter. Now the template is ready.

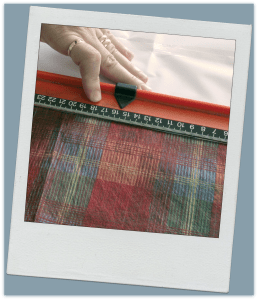
Preparing the fabric. To select the right fabric to cover my shade, in addition to considering colour and design, I have to consider its transparency as well as the amount of heat my lamp expels because I do not want my chosen material to melt. That’s why I read the fabric label carefully to determine its heat sensitivity. Afterwards I wash and iron the fabric perfectly. I lay the template on the wrong fabric side and I trace it with a soft pencil.

Checking up fabric design. The above mentioned template process, although laborious, helps me to understand everytime if the fabric design is suitable for my lampshade. The correct fabric position is important: the design must be in evidence, both on the front and on the rear shape side; it should not be cut out badly on the edges and pretty harmonious! On the contrary, I can always remove the fabric and take it on again, or even replace it, in order to get a first-rate colour-rich canvas.


Cutting the fabric. I place the template on the wrong side of my beautiful fabric and trace all cutting lines with a soft pencil. I cut the fabric out carefully. The new cover is now ready to be glued to the shade.


Attaching the fabric: 1° step. From the location of the wrong side mark I have traced on the shade, I spray the adhesive glue suitable for fabrics vertically every 5-6 cm. and let the fabric adhere perfectly by pulling well to remove all traces of air bubbles and wrinkles. At the close of I control my shade again and decide to go on working or not.


Sticking the fabric: 2° step. I lift the fabric for at least a quarter of its length and I spread a fair glue quantity with a flat brush on the shade, especially on the top and bottom edges. I let adhere and adjust the fabric again. I press it gently to remove any air bubbles and wrinkles. I let the glue dry for a few minutes. I continue with the rest of the fabric almost as far as the rear vertical seam.

Finishing the rear seam. At the rear shade seam I wrap the fabric around to create a vertical folded side flap. I stick this flap on with glue making sure that it fits perfectly.

Glue drying. I let the glue dry for at least 6 – 12 hours.

Finishing the upper and lower inside seams. There are two methods: glue or double-sided adhesive tape. By means of glue, with a little flat brush I spread a fair glue quantity along the inside lower edge (5-6 cm. at various time), I fold in the fabric inward and make it carefully fit to the frame. I apply binder clips around the wire rim in order to hold the fabric down while the glue dries and I cut out the exceeding fabric with scissors or a craft cutter. I make sure that the glue is completely dry before going on. When the fabric is all right I clean up any glue residue inside the shade with a soft cloth and isopropyl alcohol. By means of double-sided adhesive tape, I let adhere one side of the tape to the inside lower rim; the other side, to the upper one. I tug the fabric into right position, perfectly taut, without air bubbles and wrinkles. At the end, as soon as the glue is dry, or the tape is well fixed, I repeat for the upper rim.


This is simply so helpful. Thank you so very much. Easy to understand and no fuss. All my best to you and please stay safe.
"Mi piace"Piace a 1 persona
Hello 🙂
Me, very happy to be helpful. Thank you so much for your visit!
Have a wonderful Christmas 🎄
Sid
"Mi piace"Piace a 1 persona